Compatibility is one of the most important issues when it comes to WordPress. If you want to install a a copy on your local machine, then you have to follow some simple steps.
First, download the archive on wordpress.org. For the purpose of this tutorial we are going to use wordpress-2.9.tar.gz archive, which is usually automatically saved in / home / username / Downloads.
Open a new Terminal and create a wordpress folder in / home / username with the command
mkdir wordpress
Being in the username folder, and make sure you have full rights on wordpress folder. You can do this by using the command
chmod 777 wordpress
Before writing the actual commands we must have that specific folder in the path of the terminal. Navigation is very similar to Windows, including the cd with no parameters to access the home folder or cd / path / folder to access a certain path.
Using this simple command, we navigate to the folder where wordpress-2.9.tar.gz is situated and we write the command:
wordpress-2.9.tar.gz cp / home / nume_user / wordpress
This will copy the archive to the wordpress folder. Then we move into the wordpress folder (cd / home / user_name / wordpress) where we write the unzip command:
tar-zxvf wordpress-2.9.tar.gz
This will create another folder in wordpress with the same name, which will be necessary to install the actual copy on your local machine. You can also rename this folder using:
mv wordpress the_name_you_want
Previous commands can also be accessed very easily from the GUI, but for those who want to develop in Linux it is better to learn the basic commands in Terminal. The Apache server accesses the files in / var / www, so we cannot install WordPress locally, until we change the settings for Apache.
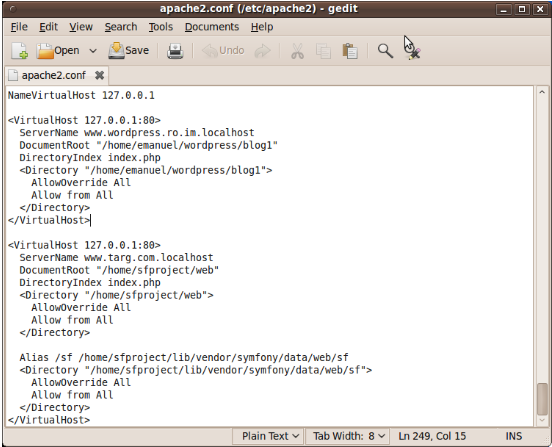
sudo gedit / etc/apache2/apache2.conf
We use sudo because this is a file that only the administrator of your machine can access. You will also be asked for the root password after pressing enter. Next, in apache2.conf we write the following lines:

Save and access in the Terminal: sudo gedit / etc / hosts adding a line with 127.0.0.1 Where and www.wordpress.ro.im.localhost. Restart apache:
sudo / etc/init.d/apache2 restart
Thus configured, we can access the website at http://www.wordpress.ro.im.localhost. This allows the installation of multiple platforms of wordpress and their separate configurations. Furthermore, the actual location for each will be in / home / user_name / wordpress / website_name.
About Author:
Brad’s a Linux enthusiast and is currently working on migrating his latest project (made in WordPress), Findermind.com to a new Ubuntu dedicated server.

