 I have seen many 3d modeling softwares including blender (popular one) but i have to say that cheetah3d is the easiest to learn 3d modeling software and it is as good as others. Dont forget that cheetah 3d will only run in mac OSX and wont run in windows or other versions.
The software is a budget friendly software and costwise it is very good and if you are a beginner just starting to put steps in 3d modeling, my advice is you should never spend money buying expensive softwares at least for the start.
If you havnt touched cheetah3d, this tutorial will take you to the very first steps for a beginner. I will not be going very deep into cheetah 3d and i am going to keep it pretty simple.
Getting Started
Before you start with cheetah 3d, you will first need to know the shortcuts just to pan and rotate the 3d view camera. Go to cheetah 3d > preferences, then depending on touchpad or mouse, assign the keys. You can drag and rotate using mouse wheel and ALT + click drag for macbook. This is very important without which you will find modeling boring without getting a proper view on all sides of the 3d environment.

Understanding the Basics
Before we go any further, i want everybody to familiarize with the 3d dimensional axis (X,Y,Z). Most modeling software use the same concept of mapping colors to xyz.
Red,Green,Blue (RGB) ==> X,Y,Z
So the any green line you see in cheetah always means that it is Y axis and Blue means its always Z axis. So goes for Red.

Lets go a bit further and learn some basics…
Transform, Scale & Rotate
Now we look into transform, scale and rotate in cheetah 3d. In 3d the fundamental building block or basic shape is a cube and with cube you can model anything, and to do that it is very important to grasp the basic transforms such as transforming, scaling and rotating of a 3d object.

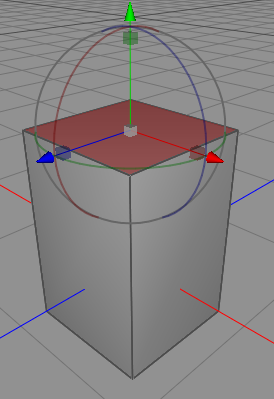
If you notice the above image, see how the top face is selected and the cube has arrows, small square boxes in 3 colors and some 3 rings surrounding it. Each has its own purpose and see below..
Arrow = transform
Box = scale
Rings = rotate
You just have to click and drag on any of the objects to transform, or scale or rotate any of the above.
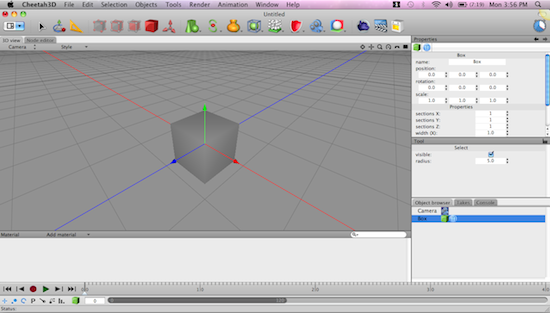
Further you will see this in the menu bar you will see the various edit modes.

Notice carefully that in the first cube, you will see just points, then edges, then faces and then solid cube. These are edit modes
(1) Point Select
(2) Edge Select
(3) Face Select
(4) Object Mode
(5) Pivot mode
To edit a object or model one, you have to use any one of the modes and in most cases you will use (1) (2) and (3) quite often.
Playing around with Cube
Now we know something about cheetah 3d and we are going to just play around with a cube. Its quite a fun. Go ahead and add a cube. You will find that if you pull the arrows and the cube will just move here and there you wont be able to stretch or scale or elongate it. In order to properly transform a cube, you have to first make it editable. Go to
Dont forget that before you edit a object, it has to be on editable mode. Go to Objects > Make Editable and soon you will find the edges clearly visible OR you can also double click the cube on the object browser to make it editable.


Dont forget that all the transforms and the modes of face select, edge select and point select will ONLY work if the object is made editable.
Once you make the cube editable, you will clearly see the edges and go ahead,
1. Select a side face in y-axis or x-axis
2. Click on face select mode and pivot mode
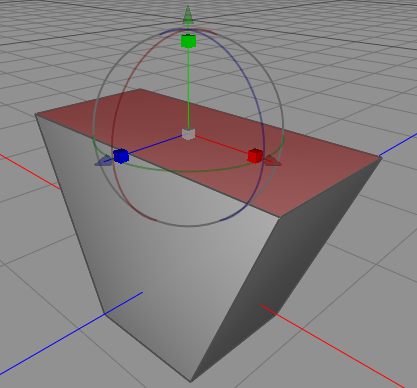
drag red the arrow sideways or pull the green or red square block and immediately you will see the cube change its shape.


Notice how i deformed the cube buy just playing around in both x and y axis.
Smoothening Models
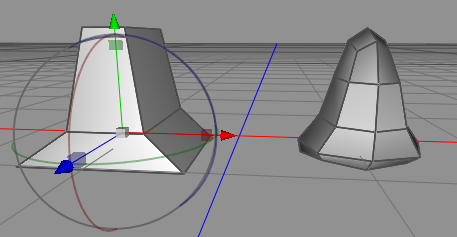
Finally, one last thing you will know on smoothen the models which is known as catmull-clarke subdivision. Just right click anywhere on the object and with just a click you can smoothen the 3d models using this. Notice in the below screenshot, the pillar like object is smoothened with just a click using catmull-clarke subdivision.

I hope you have enjoyed learning cheetah 3d as much i did. Dont forget to go through the manual Cheetah 3d > Help > Manual which comes preinstalled in your cheetah application plus there are plenty of video tutorials in the cheetah3d forum
